CSV Data Merge
CSV data merge in Chitmunk turns a spreadsheet into a deck. Type {{Column Name}} inside any text element, drop a CSV onto the canvas, and Chitmunk generates one card for every row. The same template handles 5 cards or 500. Image bindings, conditional visibility (==, !=, >, <, contains, between), and pipe transforms (upper, lower, truncate) all work from the same data. This guide walks through preparing your CSV, importing it, binding columns to text and images, hiding elements when a column is empty, and previewing every card in the bottom navigator.
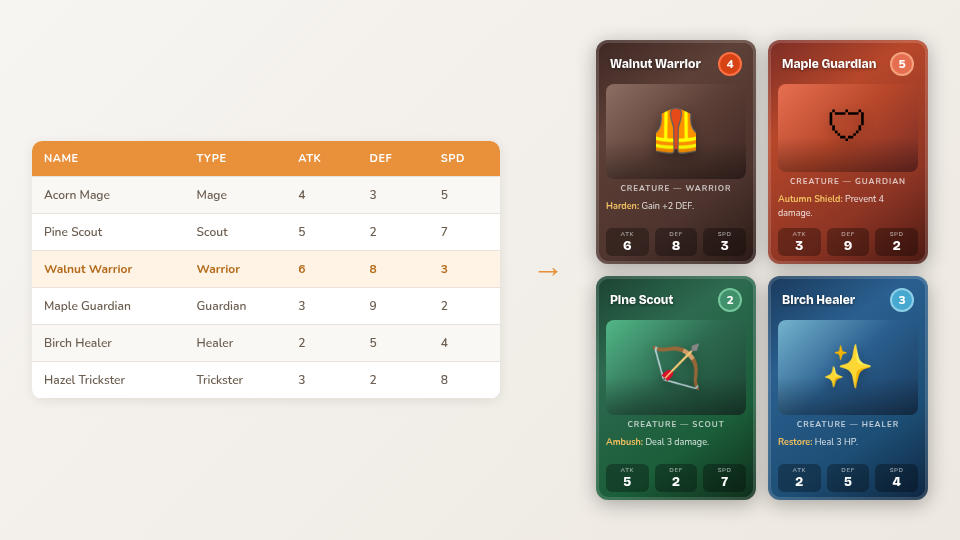 One template, one spreadsheet, every card filled automatically.
What Is Data Merge?
Imagine you are designing a deck of 60 monster cards. Each card has the same layout: a title at the top, an illustration in the middle, and stats at the bottom, but the content differs for every monster. Without data merge, you would need to edit 60 individual cards by hand. With data merge, you design the layout once and let a CSV file supply the unique content for each card.
This approach has several advantages:
- Speed: Design once, generate dozens or hundreds of cards instantly.
- Consistency: Every card uses the exact same layout, so changes to the template apply everywhere.
- Iteration: Update your spreadsheet and the cards update automatically, no need to re-edit individual cards.
- Separation of concerns: Game designers can focus on data (balance, flavor text) while graphic designers focus on layout.
Preparing Your CSV File
Your CSV file is a simple spreadsheet where:
- The first row contains column headers (field names).
- Each subsequent row represents one card.
- Column names can contain spaces and mixed case (e.g., "Card Name", "Attack Power").
You can create CSV files in any spreadsheet application: Google Sheets, Excel, LibreOffice Calc, by exporting or saving as CSV. Here is an example:
Name,Type,Attack,Defense,Description,Image URL
Fire Drake,Dragon,8,5,A fearsome wyrm that breathes scorching flames.,https://example.com/fire-drake.png
Stone Golem,Construct,6,9,An ancient guardian carved from living rock.,https://example.com/stone-golem.png
Shadow Thief,Rogue,7,3,Strikes from the darkness before you see the blade.,https://example.com/shadow-thief.png
Forest Sprite,Fey,4,4,A playful trickster of the woodland realm.,https://example.com/forest-sprite.png
Iron Knight,Warrior,7,8,Clad in impenetrable plate from helm to heel.,https://example.com/iron-knight.png
Tip: Keep column names short but descriptive. You will be typing them into template bindings, so "ATK" is easier to work with than "Monster Attack Power Rating".
Importing Your CSV
There are two ways to load a CSV file into Chitmunk:
- Data button: Click the Data button in the toolbar. A panel opens where you can paste CSV text or click to upload a .csv file.
- Drag and drop: Drag a .csv file from your file explorer directly onto the Chitmunk canvas.
After loading, Chitmunk parses the file and displays the number of rows (cards) detected. The CSV panel also shows a helpful hint reminding you to use {{Column Name}} syntax in text elements to auto-fill values from your data. The bottom navigator bar shows the current card name and position (e.g. "Card 3 of 36") with prev/next arrows so you can step through each card variant.
Template Syntax
To make an element dynamic, use double-curly-brace syntax in text content:
{{Column Name}}For example, if your CSV has a column called "Name", type {{Name}} in a text element. Chitmunk replaces it with the value from the current row. You can mix static text and template tags freely:
ATK: {{Attack}} / DEF: {{Defense}}This would render as "ATK: 8 / DEF: 5" for the Fire Drake row.
Fallback Values
If a column might be empty for some rows, you can provide a default value using the || operator:
{{Subtitle || 'No subtitle'}}If the "Subtitle" column is empty or missing for a given row, the text "No subtitle" will be displayed instead.
Text Transforms
You can transform text values using pipe operators:
| Syntax | Result | Example |
|---|---|---|
{{Name|upper}} |
UPPERCASE | "Fire Drake" becomes "FIRE DRAKE" |
{{Name|lower}} |
lowercase | "Fire Drake" becomes "fire drake" |
{{Name|capitalize}} |
Capitalize First Letter | "fire drake" becomes "Fire drake" |
{{Description|truncate:50}} |
Truncate to N characters | Cuts text to 50 characters and appends "..." |
{{Name|trim}} |
Remove leading/trailing whitespace | " Fire Drake " becomes "Fire Drake" |
Transform Chaining
You can chain multiple transforms together using additional pipe operators. Transforms are applied left to right:
{{Name|trim|upper}}This first trims whitespace from the value, then converts the result to uppercase.
Image Bindings
Text elements use {{Column Name}} syntax directly in their content. Image elements work differently; they use a binding property.
- Select an image element on the canvas.
- In the properties panel, find the Binding section.
- Choose a CSV column from the dropdown. The column should contain image URLs (http:// or https://).
When the CSV row changes, Chitmunk loads the URL from the bound column and displays it in the image element. This lets you assign unique artwork to each card automatically.
Tip: Image URLs must be publicly accessible (no login required). If your images are local files, upload them to a hosting service first, or use the AI image generation feature to create art directly in Chitmunk.
Conditional Visibility
Sometimes you want an element to appear only on certain cards. For example, a "Flying" badge should only show on cards where the Type is "Dragon". Chitmunk supports conditional visibility rules on any element.
Select an element and look for the Conditional Visibility section in the properties panel. Set a condition using one of these operators:
| Operator | Meaning | Example |
|---|---|---|
== |
Equals | {{Type}} == 'Dragon' |
!= |
Not equals | {{Type}} != 'Construct' |
> |
Greater than | {{Attack}} > 6 |
< |
Less than | {{Defense}} < 5 |
contains |
Text contains substring | {{Description}} contains 'fire' |
!contains |
Text does not contain substring | {{Description}} !contains 'ancient' |
>= |
Greater than or equal to | {{Attack}} >= 6 |
<= |
Less than or equal to | {{Defense}} <= 5 |
startsWith |
Text starts with substring | {{Name}} startsWith 'Fire' |
endsWith |
Text ends with substring | {{Name}} endsWith 'Knight' |
isEmpty |
Value is empty or blank | {{Subtitle}} isEmpty |
isNotEmpty |
Value is not empty | {{Image URL}} isNotEmpty |
between |
Value is between X and Y (inclusive) | {{Attack}} between 3 and 7 |
When the condition is false for a given row, the element is hidden on that card. When it is true, the element is visible.
Boolean Logic
You can combine multiple conditions using boolean operators:
AND: Both conditions must be true:{{Attack}} > 5 AND {{Type}} == 'Dragon'OR: At least one condition must be true:{{Type}} == 'Dragon' OR {{Type}} == 'Fey'NOT: Negates a condition:NOT {{Type}} == 'Construct'
Use parentheses for grouping when combining multiple operators:
({{Attack}} > 5 AND {{Defense}} > 5) OR {{Type}} == 'Dragon'This shows the element on any card with both Attack and Defense above 5, or on any Dragon card regardless of stats.
Master Elements
By default, elements with conditional visibility are hidden when their condition is false. But what if you want an element to appear on every card regardless of any visibility rules? Mark it as a master element.
In the properties panel, toggle the Master checkbox. Master elements are always visible on every card variant, ignoring conditional visibility. Use this for elements like card borders, background frames, and logos that should be present on every card in the deck.
Data Mode
For heavy data work, click the Data button in the toolbar. This opens a split-view layout:
- Left side: A full spreadsheet view of your CSV data. You can edit cells directly by clicking them, changes update the live canvas immediately.
- Right side: The live interactive canvas for the current card. As you click different rows in the spreadsheet, the canvas updates to show that card. You can still select and edit elements directly on the canvas.
The divider between the two panels is draggable, so you can adjust the split to your preference. Data Mode is especially useful when you are fine-tuning card text or checking that conditional visibility rules work correctly across all your cards.
Bottom Navigator Bar
At the bottom of the editor, the navigator bar lets you step through every card variant generated from your CSV data. It displays the current card name and position (e.g. "Card 3 of 36") with prev/next arrows on either side. The bar also shows component info such as the card type, dimensions, bleed, and DPI.
The navigator bar updates in real time as you make changes to the design or CSV data.
Workflow Summary
- Design your card layout with placeholder elements.
- Add
{{Column Name}}bindings to text elements and image bindings to image elements. - Import your CSV file.
- Browse through cards using the bottom navigator bar to verify your design works across all rows.
- Set conditional visibility on elements that should only appear on certain cards.
- Use Data Mode for fine-tuning.
- Export all card variants as a ZIP of images or a print-ready PDF.
Tip: You can update your CSV at any time. Re-import the file and all your cards regenerate instantly with the new data. Your layout and bindings are preserved.
Google Sheets & Excel Import
Note: Google Sheets and Excel import is available to all users.
Instead of importing a CSV file manually, you can link a Google Sheet or Excel file on OneDrive directly to your project. Chitmunk imports the data and you can refresh it any time to pull the latest changes.
How It Works
- Click the Data button in the toolbar and select Google Sheets or Excel (OneDrive).
- Sign in with your Google or Microsoft account and authorize Chitmunk.
- Select the spreadsheet and worksheet you want to link.
- Chitmunk imports the data into your project.
Edits you make in Chitmunk's Data Mode are written back to the linked sheet. To pull in changes made externally, click the Refresh button in the data panel.
This is especially useful for collaborative workflows where a game designer manages card data in Google Sheets while a graphic designer works on layouts in Chitmunk.